Glue Multiple Layers of Laser Cut Wood Without Shifting Them
The quickest, most reliable way to glue layered laser cut wood is a PVA wood glue like Titebond II for broad, flat bonds, paired with a simple registration method such as pre-applied double-sided tape or a dowel pin, then clamped evenly with cauls and binder clips. For tiny parts or instant tack, CA glue works better. Work in a ventilated space between 55°F and 75°F for the cleanest results.
✦ Featured From Our Shop ✦
Handcrafted & laser engraved in Georgia, just for you
TL;DR:
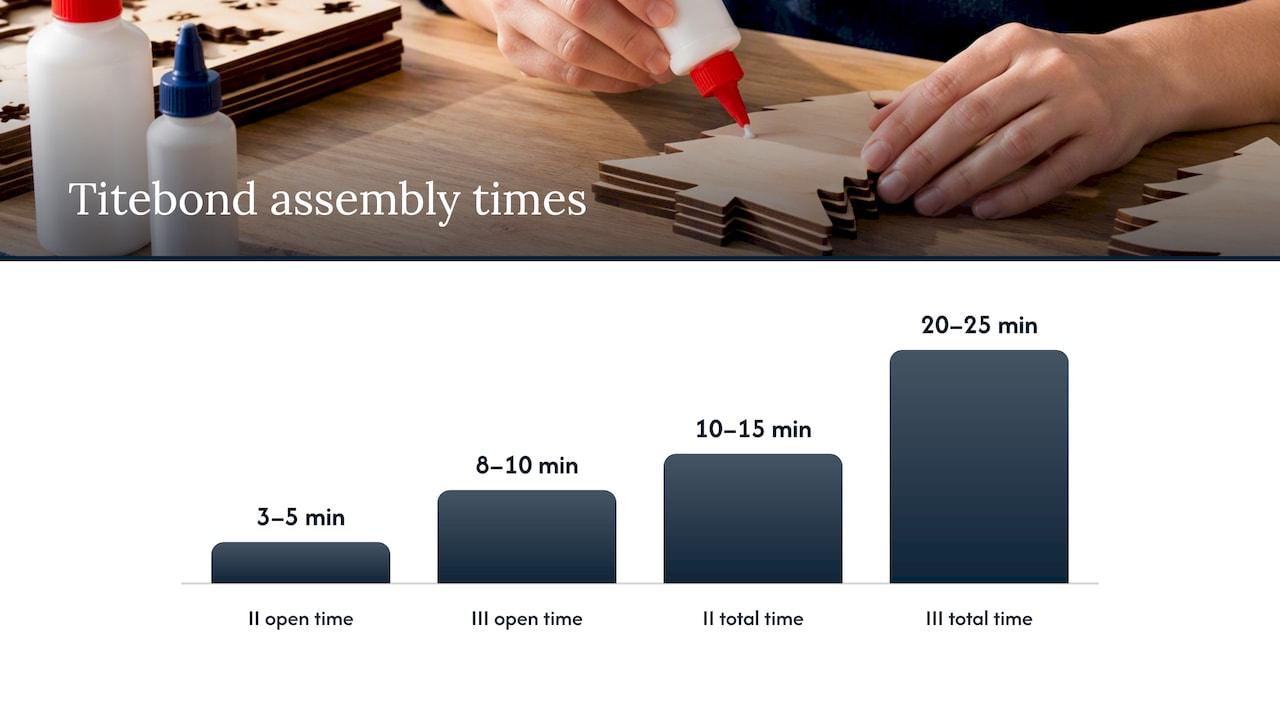
- Titebond III offers 8 to 10 minutes of open time and 20 to 25 minutes total, roughly twice Titebond II’s working window for complex stacks.
- Dry fit and number every layer, photograph the order, and assemble stacks in groups of three or four to reduce alignment errors and manage clamp pressure.
- Brush off laser soot and lightly sand mating faces; use cauls to spread pressure, and keep Gorilla Wood Glue clamped for 20 to 30 minutes.
- Reserve CA glue for tiny spot bonds because it cannot fill gaps and may become brittle under stress.
Table of Contents
- Choosing the Right Adhesive for Layered Wood Projects
- Getting Every Layer to Line Up Before You Glue
- Clamping Thin Layers Without Crushing or Warping Them
- Prepping Surfaces So the Bond Actually Holds
- A Repeatable Glue-Up Workflow for Multi-Layer Projects
- Finishing Touches After the Glue Dries
- Shop-Tested Glue-Up Notes From Our Georgia Workshop
- Should You Glue It Yourself or Buy It Already Assembled?
- Skip the Glue-Up With Ready-to-Give Layered Pieces
- FAQ
- Sources
Choosing the Right Adhesive for Layered Wood Projects
Not every glue behaves the same way on thin, laser cut stock, and picking the wrong one leads to warped layers or a bond that never quite grabs. We find the choice usually comes down to how much open time you need and whether the piece will face moisture.
Titebond Original, II, and III are the workhorses for layered craft builds. Titebond II gives you an open assembly time of about 3 to 5 minutes and a total assembly time of 10 to 15 minutes at standard room conditions, which is plenty of time to stack and align a few layers before the glue starts to set. Titebond III stretches that window to 8 to 10 minutes open and 20 to 25 minutes total, useful if you are working with more layers or a trickier alignment. Both sand cleanly once cured and take stain evenly, which matters for anything you plan to finish.
CA glue is ideal for small decorative tabs or tiny accent pieces where you need an instant bond and no clamping. It dries hard and clear but has no gap-filling ability and can get brittle under stress, so it’s a poor choice for load-bearing joints.
Epoxy is useful for filling small gaps or waterproof builds but requires a longer cure and careful sanding.
Contact adhesives and adhesive-backed sheet stock shine for full-surface laminations, especially pre-cut multi-layer kits. The tradeoff: once two surfaces touch, you generally can’t reposition them, so your alignment method has to be dead-on before contact.
Specialty laser-cut model glue with a fine applicator tip fits tiny parts where a standard glue bottle would flood the joint.
- Ornaments and small gift tags: PVA for the main bond, CA for tiny accent pieces.
- Layered signs and wall art: PVA with extended open time like Titebond III for multi-layer alignment.
- Jewelry blanks and miniatures: CA or specialty laser glue for precision spot bonds.
Manufacturer specs confirm the tradeoff: Titebond III’s open assembly time runs roughly double that of Titebond II, giving you more working room on complex stacks at the cost of a longer clamp hold.
Getting Every Layer to Line Up Before You Glue
Registration is the part crafters skip and regret. If your layers shift even a millimeter while the glue is wet, the whole piece looks off once it’s dry and sanded.
- Build registration into the cut file. Add small tabs, indexing notches, or matching pilot holes to every layer before you send the file to the laser.
- Pre-tape the sheet before cutting. Apply double-sided tape to the back of your stock, cut as normal, then peel the liner and stack. The layers snap into place with zero guesswork.
- Use a dowel or center pin. Drill a small pilot hole through the stack’s center point and slide a thin dowel or length of wire through as a temporary alignment spine, then remove it once the glue sets if it isn’t meant to stay.
- Build a simple stacking jig for repeat runs. A scrap-wood fixture with fence rails pays off fast if you’re making more than a handful of the same design.
- Label and sequence every layer during your dry fit. Number the back of each piece and photograph the stack order before you touch any glue.
Pro Tip: Dry-fit the entire stack once, snap a quick photo, and keep it next to your workbench. It saves you from gluing a layer in backward when you’re moving fast.
Clamping Thin Layers Without Crushing or Warping Them
Thin plywood layers don’t need brute force, they need even, well-distributed pressure. Too much clamp pressure in one spot and you’ll dent or bow the piece; too little and you’ll get a weak bond with visible gaps.
- Binder clips with cauls are the go-to for small and medium layered pieces: the caul spreads pressure across the face so the clip doesn’t leave a mark.
- Spring clamps work well along straight edges where you need quick, even pressure without fuss.
- Small bar clamps suit longer edges or pieces with a straight run that needs firm, consistent clamping.
- Strap clamps handle irregular or curved shapes like rounded signs or cutout silhouettes that don’t have a flat edge to clamp against.
Cauls, which are just flat scrap boards cut slightly larger than your project, protect the face veneer and spread clamp pressure so you don’t end up with divots.
Clamp time depends entirely on your adhesive. Gorilla Wood Glue guidance recommends about 20 to 30 minutes of initial clamp time at room temperature before you can safely remove the clamps, though full cure takes longer. CA sets in seconds and rarely needs a clamp at all. Epoxy needs the longest hold, often several hours, before you touch the piece.
A thin, even bead of glue squeeze-out along the edges is the clearest sign you’ve got enough pressure and enough adhesive on the joint.
Prepping Surfaces So the Bond Actually Holds
Laser cutting leaves soot and light scorching on the edges, and that residue blocks a clean bond if you glue right over it.
- Wipe soot off with a soft brush or tack cloth, then give the mating faces a light sanding with fine grit before gluing.
- Avoid gluing end grain whenever your design allows it. Woodworking guidance on glue and end grain notes that end-grain joints are inherently weaker and that laminated assemblies should allow for minor wood movement, especially across larger surfaces.
- Test adhesion on exotic or oiled veneers with a small scrap before committing an entire project to one glue.
- Check the room temperature before you start. Titebond II specs call for application above 55°F, and CA glues generally perform best in similar conditions.
Most layered laser cut projects fail at the joint, not the material: manufacturer clamping and prep guidance points to surface prep, not glue choice, as the detail crafters skip most often.
A Repeatable Glue-Up Workflow for Multi-Layer Projects
Following the same sequence every time keeps results consistent, whether you’re building one ornament or a batch of twenty.
- Dry-fit the whole stack first. Number each layer on the back, confirm orientation, and snap a reference photo before any glue touches the wood.
- Prep your surfaces and tools. Lightly sand mating faces, wipe away soot, and lay out your clamps, cauls, and dowels within reach so you’re not hunting for them with wet glue on your fingers.
- Apply adhesive with the right tool for the job. A fine-tip glue bottle works for PVA on small pieces, a small brush or roller spreads it evenly on larger faces, and pre-applied tape skips this step entirely.
- Align the stack using your chosen registration method, then bring the clamps in with cauls in place. A thin, even squeeze-out bead along the seam tells you the pressure is right.
- Respect the open and clamp times for your glue. PVA gives you a few minutes to adjust before it grabs; CA locks almost instantly; epoxy needs the longest hold before you can move on.
- Let the piece reach full cure before sanding or finishing. Rushing this step is the most common reason a glued stack shows gaps later.
Pro Tip: Stage your layers in small groups of three or four rather than gluing an entire ten-layer stack at once. It keeps alignment tight and gives you more control over clamp pressure.
Finishing Touches After the Glue Dries
Once the stack is solid, how you clean up and sand determines whether the glue lines disappear or stay visible under stain.
- Wipe wet glue squeeze-out with a damp cloth right away rather than letting it cure and scraping it off later, which can tear surface fibers.
- Sand in stages, starting around 120 grit to level any high spots between layers, then moving to 220 for a finish-ready surface.
- Fill visible gaps with wood filler, and save thin CA or epoxy for tiny pinholes where a filler would look chalky.
- Seal evenly before staining since layered plywood faces can absorb stain unevenly if one layer is slightly more porous than the next. Our staining guide for a wolf silhouette cutout walks through getting consistent color on a common layered design.
Shop-Tested Glue-Up Notes From Our Georgia Workshop
PVA is a good choice for most layered gift pieces because it sands clean and takes stain evenly; pre-taped stock is helpful for delicate inner details that are fragile to hand-align.
- We label every layer before assembly to keep orientation straight, the same habit we recommend above.
- We stage multi-layer builds in small batches so clamp pressure stays even across every piece.
- A layered howling wolf silhouette or a guitar cutout sign both benefit from this same registration-and-caul approach when stacked as decor pieces rather than cut as a single flat shape.
— Gary
Should You Glue It Yourself or Buy It Already Assembled?
DIY glue-up makes sense when you want full creative control, you’re experimenting with a design, or you’re only making one or two pieces. Buying a finished or pre-assembled item saves time and guarantees perfect registration, which matters most for gifts on a deadline. We support both paths, whether you want blanks to assemble yourself or a finished piece ready to give.
Skip the Glue-Up With Ready-to-Give Layered Pieces
If a glue-up isn’t how you want to spend your evening, we can help. Our Custom Gift Creation service handles the cutting, aligning, and finishing so you get a ready-to-give keepsake without touching a clamp. Browse our unfinished wood blanks and custom-cut pieces if you’d rather assemble it yourself with stock that’s already sized and ready to glue.
For craft-ready layered pieces, the Howling Wolf Wood Cutout in 1/4 inch plywood (on Etsy) and the Wooden Guitar Cutout Sign (on Etsy) both make great starting points for a layered decor project or a one-of-a-kind gift. Visit our shop to see what’s ready to order today.
FAQ
What is the best glue for gluing wood to wood?
For most wood-to-wood bonds, a PVA wood glue like Titebond II or III is the top choice because it sands cleanly, holds strong on flat faces, and takes stain evenly. CA glue is better suited to small spot bonds rather than full panel joints.
Is Gorilla Wood Glue stronger than Titebond 2?
Both are PVA-based wood glues built for similar woodworking tasks, and neither manufacturer publishes a direct strength comparison against the other. Gorilla Wood Glue’s own guidance focuses on proper surface prep and clamp time as the bigger factors in joint strength, which matters more than brand choice for most layered projects.
What will wood glue not adhere to?
Standard PVA wood glue struggles on oily or resinous woods, plastics, metals, and glass because it needs a porous surface to grip. It also bonds poorly to dusty or soot-covered laser cut edges unless you clean and lightly sand them first.
How do I glue two pieces of wood together?
Clean and lightly sand both mating surfaces, apply an even layer of PVA glue with a brush or fine-tip bottle, then align the pieces and clamp them with a caul to spread pressure evenly. Hold the clamp for the manufacturer’s recommended time, generally 20 to 30 minutes for initial hold, before letting the joint cure fully.
Sources
- Gorilla Wood Glue product page
- Woodcraft guide on gluing and end grain
- Walthers / Busch Laser-Cut Glue product page
Recommended
- Crafters: Avoid a 500 Piece Mistake Buying Bulk Laser Cut Wood Shapes
- Laser-Cut Wood Cutouts — Custom Décor & Gifts from SigLaserDesigns
- Prep Unfinished State Cutouts for String Art: Laser Cut Fixes